How to Use WordPress’ Text Editor: for Advanced Users
Are you ready to start using HTML code?
If you’ve been using WordPress for a while and are comfortable creating and editing pages using the ‘Visual’ editor and are interested in having more control over your website or have been frustrated by the lack of precise control over the layout or appearance of your web pages, then keep reading because this article is for you.
Before we begin, you need to be aware of a few key points.
First, using the text editor in WordPress means working directly with the HTML code that acts as the scaffolding that holds your text and images in place. Because of the increased power this language provides you, it also comes with the responsibility to edit wisely and with caution.
Secondly, you need to realize that it is common to make mistakes when using HTML code, because any single typo can make or break your code, so be sure to double check your work, and don’t be afraid if things look broken, just go back to your text editor and examine what you did.
Third, WordPress contains a “Revisions” feature that you should feel free to utilize when you need to revert back to a previous version of your page.
And lastly, don’t hesitate to search the internet with questions about your HTML code, CSS styling, or how to achieve a specific goal. The internet is your friend!
How to create pages in WordPress using its “text” editor
Step 1) Write in (or paste as text-only) all text content, don’t worry about styling just place text in paragraph form and inside <p> tags.
Step 2) Add Images to page using the WordPress Media Tools
Step 3) Save Page as Draft and then preview in a new browser window
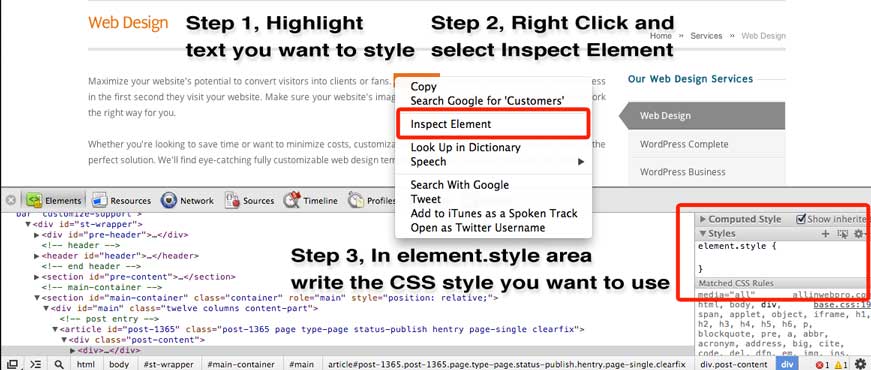
Step 4) Use Google’s Chrome browser’s Inspect Element tool to test out any custom changes to your website’s styles and quickly see view those changes without having to update everytime. A basic review of what styles are will help you a lot, check out W3schools CSS tutorials. (see photo below)
Step 5) Copy and Paste the CSS rule from Chrome into a style tag ( style=” ” ) inside of the tag containing the text (i.e. Tags can have multiple styles just use a semi-colon ( ; ) to separate them)
Step 6) Rinse and repeat until the page shines
Useful Html Tags
When using tags be careful to ensure that you alway close them correctly; to close a tag you simply rewrite the tag with a / right inside of it (i.e. <p> Whole Paragraph of Text </p>)
<p> This defines the stuff inside of tags as a paragraph
<div> This defines the things inside of the tags as a separate division of the page, great for layout purposes
<br/> Creates a line break, does not need a closing tag since it closes itself
<a href> Sets things as a link, WordPress will create this if you highlight what you wish to like and then click on the link tool in the WYSIWYG editor (3 button on first row)
<img> Used for images, does not need a closing tag since it closes itself. WordPress creates these when using the media tool
<ul> Creates a unordered list of items
<li> Defines the items to go into the list
<h1> Defines the text as a Header, there are 6 header sizes, H1 being the largest and H6 smallest
Creates a space without breaking onto a new line
Common Style Properties
font-size Sets how big the text is, should be set using px
color Sets the color of the text, best practice is to set with hex code of color
margin Sets the amount of space around an object
text-align Sets of how the text align on the page, this is relative to any <div> tags the text is inside of
letter-spacing Sets the leading for the text
float Tells an object which side of the page to align to, mostly used for images but can be used for <div> tags to create layouts
Related Posts


Las Vegas Web Design: Best of the Best DJ’s
The owner of Best Of The Best DJs, one...


Google Can’t Pass its Own Mobile-Friendly Website Test
As a Las Vegas web designer I'm...


Nevada Volunteer Research Initiative: Website Launch
The Nevada Volunteer Research Initiative...
Nice post. WPEngine disables revisions by default.